
Dependency, dependency, and dependency! Dependency is an evil being that used to haunt software development, now it has come to data analysis. Out of the 14 million possibilities, there is one way to defeat it. The answer is Docker!
Based on whether you will use rstudio-server or jupyter notebook, the following blog will split into two parts. One part is about how to run a Docker container for jupyter, another part is about how to run a container for rstudio-server, somewhat similar to jupyter.
Before we proceed, it is recommended that you create an account on DockerHub, a hosting service for Docker images. See the line here.
Jupyter notebook
After registering an account on DockerHub, you could search for the possible Docker images there. After a little search and trial, I found this container. It has pre-installed R, Python3, Julia and most of the common images for data science. See more details on its DockerHub.
How to use it? Simply type the below command into your terminal:
docker run -it --rm -p 8888:8888 jupyter/datascience-notebook
After downloading about a 6GB Docker image, it would start the jupyter notebook, you will have something like this.

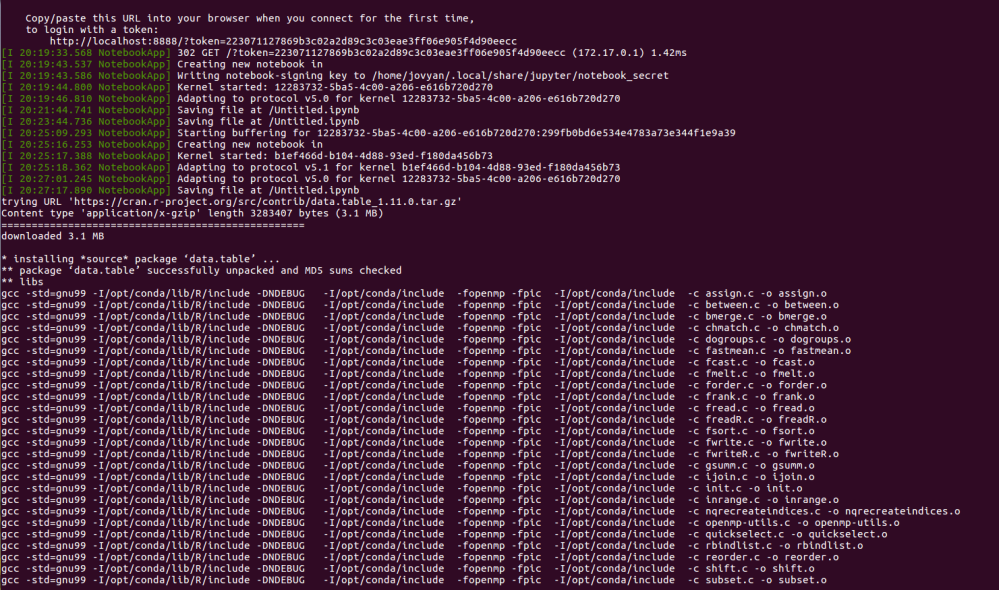
On the second line of the second picture, you see a sentence “to login with a token: …..”.Simply by clicking the http address, you would see a jupyter notebook.

Then, you have the jupyter notebook with support for R, Python3, and Julia. Let us see if the most common packages are installed.

Let us test if most R packages are installed.

Worth noting here that data.table package is not installed.
Let me try to install my automl package, dplyr and caret package from Github.
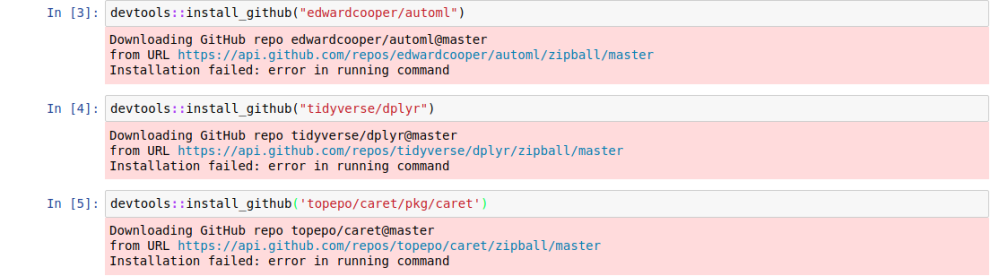
It seems that there are some issues with installing from Github. But all the R-cran install works perfectly.
Multiple terminals.
In order to download some files or made some changes to the Docker environment, you could open up another terminal by
docker exec -it bash
After you are done, you could use ctrl+p+q to exit the container without interrupting the container.
Rstudio-server
For those of you who did not know Rstudio-server, it is like the jupyter notebook for R.
The image I found on the DockerHub is this.
To use it, you should first download it.
docker pull dceoy/rstudio-server
Then, you run the image with the command below:
docker container run --rm -p 8787:8787 -v ${PWD}:/home/rstudio -w /home/rstudio dceoy/rstudio-server
The Rstudio-serve would not start itself, you need to type the address below into your browser.
Then, you will need to enter the username and password, both of which are rstudio.
Let us see if the common packages are installed.

Then, let us try to install my automl package from Github.


It works perfectly. (I still have some dependency issues with some of the packages to resolve in my package, but the conflicts are printed here.)
You could use ctrl+p+q to exit the docker without interrupting the container while using either Jupyter or Rstudio-server.
In the future, you might download an image and run it, install some more software. How do you save the current state of the container? Simply commit the current image just like using Git. (If you do not know anything about Git, you could refer to my previous blogs.)
docker commit lucid_pike edwardcooper/rs-automl:0.0.0.9000
lucid_pike is the NAMES of the container that you want to commit. edwardcooper is my DockerHub’s username, rs-automl is the name of the image, 0.0.0.9000 is the tag for the image. I used this format since it is the required format to push to DockerHub.
This is what it looks like.

By using docker images, you could see the image you have committed.

Then you login to your DockerHub account, and push the image to DockerHub.
#login to your DockerHub

docker login

#push your image to DockerHub

docker push edwardcooper/rs-automl:0.0.0.9000
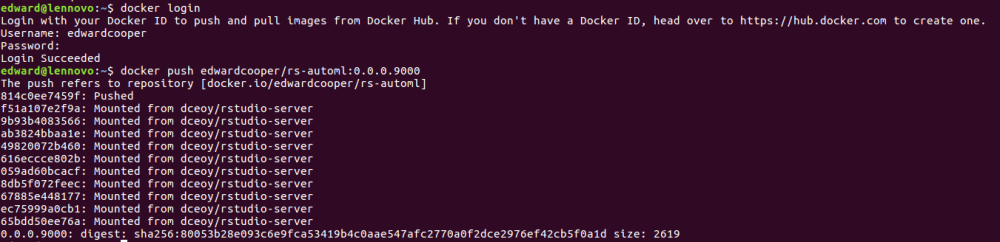
The DockerHub is clever to only upload the part I change so the process is fast even though this image is almost 3GB.
This is all for docker tutorial series. If you missed it, here is the part on how to install Docker on Ubuntu 16.04, this blog is about some basic commands we used.
I intentionally left out the part about Dockerfile, since it is not extremely useful for using Docker for data analysis.
These blogs hope to give a no-bullshit and bare minimum tutorial for you to start using docker for data analysis. Let me know in the comment below.
I will keep on updating this blog as I work my way through with learning python data analysis tools using jupyter.
Why am I interested in switching from R to Python? I recently was admitted to Insight Data Science Program in Boston, and I learned that Python is the de facto tools for data analysis in tech companies since data scientists are constantly working alongside with Software engineers. That is why Python is gaining more and more momentum. Plus, after using R for more than 2 years, I encountered many obstacles and love to try out Python for a change. A lot of my friends doing NLPs or computer visions use Python since Python dominates the field of deep learning without any competition.
Let me know what you think about it in the comments below.
